

After a brief overview on object detection and YOLOv5 in this tutorial, we will show how to develop an object detection model.
Object Detection Model
If you want to know more about object detection, we suggest you read our previous article on this topic. For the scope of this tutorial, it will be enough to remember a simple and intuitive definition given on TensorFlow’s official webpage (a free and open-source software library for machine learning and artificial intelligence):
“Given an image or a video stream, an object detection model can identify which of a known set of objects might be present and provide information about their positions within the image” [1].
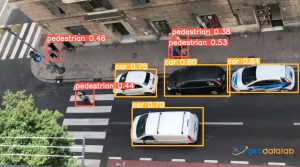
Figure 1 – Object Detection Model example
For example, in Figure 1, several objects have been recognized, and their positions annotated. This model deals with two categories of known objects: “pedestrian” and “car”.
YOLO v5
Definition from YOLO v5 official repo:
“YOLOv5 is a family of object detection architectures and models pre-trained on the COCO dataset. It represents Ultralytics open-source research into future vision AI methods, incorporating lessons learned and best practices evolved over thousands of hours of research and development” [2].
So object detection, which is an easy task for humans, is a hard one for machines. YOLO v5 gives a big help on advancing on this purpose and paves the way to approach Computer Vision Software Engineering. YOLO v5 is the first model of the family written in the PyTorch framework, whose main advantage compared to other predecessors is the higher development speed for newbies. Last but not least, it’s open-source and getting developed continuously.
Project folder & virtual environment
1) Create an empty folder on your PC named – for example – obj_detection
mkdir obj_detection
2) Create a virtual environment before installing the requirements of the YOLO v5 framework. This is always a best practice because“virtual environments make it easy to cleanly separate different projects and avoid problems with different dependencies and version requirements across components” [3]. In this tutorial, we will be using conda virtual environment:
conda create -n yourenvname
3) Activate your virtual environment:
conda activate yourenvname
Installing YOLO v5 and dependencies
4) Open a new terminal and change the working directory to the project directory
cd obj_detection
5) Clone the yolov5 repo from GitHub:
git clone https://github.com/ultralytics/yolov5.git
On the project directory, a new folder named yolov5 will be created containing an important python file detect.py. As the name indicates, this module is the one to execute for object detection.
6) After cloning the repo, enter the yolov5 folder:
cd yolov5
7) Install the requirements:
pip install -r requirements.txt
Model Training
In order to train Yolov5 on your dataset, labels and annotations should follow the Yolo format. This article [4] will guide you to succeed in this intent.
In this tutorial, we want to train a model for a drone imagery application, so VisDrone2019-DET [5] (with namely 8,599 images captured by drone platforms in different places at different heights and with more than 540k bounding boxes of targets are annotated with ten predefined categories) is one of the best candidates.
Deep learning frameworks, like YOLO, require high-performance computing. Nvidia’s GPUs are the best match for such projects. Just for having an idea of the difference, if with a standard CPU you can process a few frames per second (fps), with a graphics processing unit (GPU), you can go up to 50 fps or more [6].
Since not every one of us has a PC with a GPU installed on it, we will step out on the stage of Google Colab. We can train our model with the resources granted for free from Google.
8) Follow the step-by-step process of Google Colab YOLO v5 Jupyter Notebook [7].
Once you reach the third step (Train), pay attention to passing the VisDrone dataset as an argument of the train.py!
# Train YOLOv5s on VisDrone for 3 epochs
!python train.py --img 640 --batch 16 --epochs 3 --data VisDrone.yaml --weights yolov5s.pt --cache
Export weights for future inference
9) After running all the steps of Google Colab YOLO v5 Jupyter Notebook, download the best.pt file generated and paste it inside the local yolov5 folder of your PC. This file has the trained weights needed to perform object detection locally.
Run YOLO v5 on your local environment
Now everything is set up to enjoy the magic of AI.
10) Copy the image or video you want to test inside the yolov5 folder.
11) Before running the inference on your data, make sure that your yolov5 folder contains your image and video files, the best.pt weights file generated by Google Colab, and the detect.py file.
12) You can then run inference inside the yolov5 folder by using this command:
python detect.py --weights best.pt --source YourVideoInput.mp4
13) Once the process gets completed, you can check the result inside the path: /obj_detection/yolov5/runs/detect/exp on every execution of step 9.
Fonti
[1] Object detection – TensorFlow
[2] YOLOv5 Repo on GitHub – Ultralytics
[3] Create virtual environments for python with conda
[4] How to Train YOLO v5 on a Custom Dataset – Paperspace.com
[5] VisDrone Dataset – aiskyeye.com
[6] The World’s First AI Supercomputing Data Center GPU – Nvidia
[7] YOLOv5 – Google Colab Jupyter Notebook